Wednesday, September 20, 2006

Coding the Main Character

Once you have positioned all the different characters, you can start coding the game. You need to start with one activity after the other. Indeed, the code for the main game is obviously the more complicated, therefore you need to be organized and document the different elements you are using. Besides, you may test regularly your progress by compiling the game and executing it.

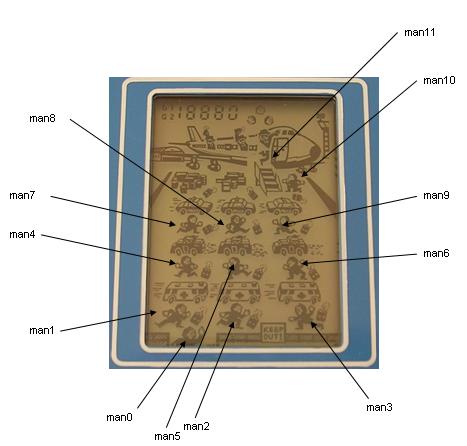
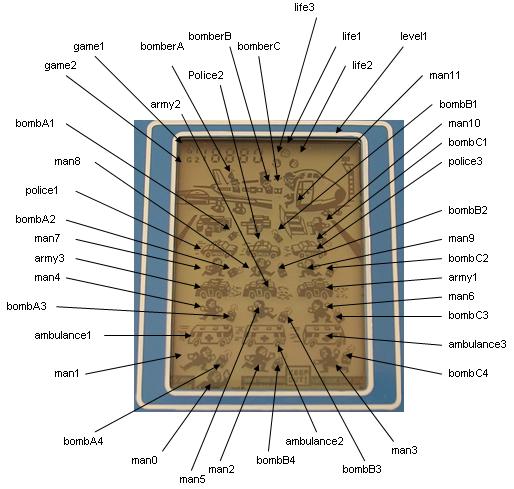
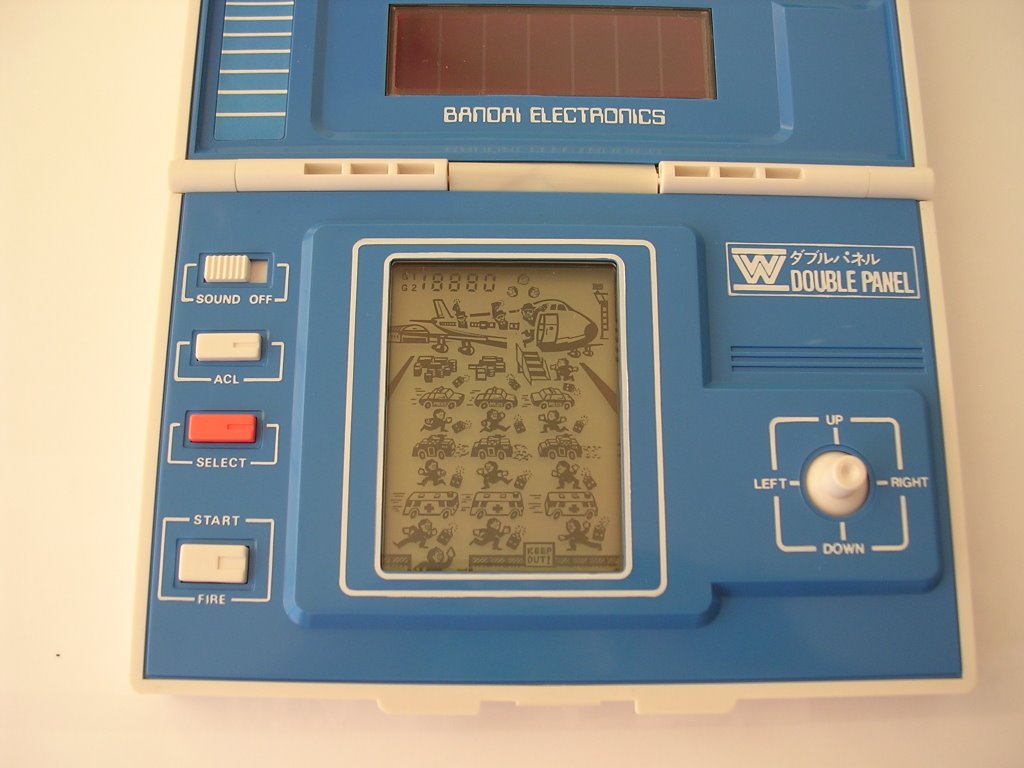
Let's start with the coding of the level 1 game and more precisely with the main character. You need again to play the game in order to understand the pattern of the character's movement along with any interaction with the other characters or surroundings.

Here is the code for moving the main character:
if (key=VK_RIGHT) and (Blocked=false) then begin // Key Right
if PosChar=2 then begin PosChar:=3; ImageMan3.visible:=true; ImageMan2.visible:=false; PlaySound(pfPlay); end;
if PosChar=1 then begin PosChar:=2; ImageMan2.visible:=true; ImageMan1.visible:=false; PlaySound(pfPlay); end;
if PosChar=5 then begin PosChar:=6; ImageMan6.visible:=true; ImageMan5.visible:=false; PlaySound(pfPlay); end;
if PosChar=4 then begin PosChar:=5; ImageMan5.visible:=true; ImageMan4.visible:=false; PlaySound(pfPlay); end;
if PosChar=8 then begin PosChar:=9; ImageMan9.visible:=true; ImageMan8.visible:=false; PlaySound(pfPlay); end;
if PosChar=7 then begin PosChar:=8; ImageMan8.visible:=true; ImageMan7.visible:=false; PlaySound(pfPlay); end;
end;
if (key=VK_LEFT) and (Blocked=false) then begin // Key Left
if PosChar=2 then begin PosChar:=1; ImageMan1.visible:=true; ImageMan2.visible:=false; PlaySound(pfPlay); end;
if PosChar=3 then begin PosChar:=2; ImageMan2.visible:=true; ImageMan3.visible:=false; PlaySound(pfPlay); end;
if PosChar=5 then begin PosChar:=4; ImageMan4.visible:=true; ImageMan5.visible:=false; PlaySound(pfPlay); end;
if PosChar=6 then begin PosChar:=5; ImageMan5.visible:=true; ImageMan6.visible:=false; PlaySound(pfPlay); end;
if PosChar=8 then begin PosChar:=7; ImageMan7.visible:=true; ImageMan8.visible:=false; PlaySound(pfPlay); end;
if PosChar=9 then begin PosChar:=8; ImageMan8.visible:=true; ImageMan9.visible:=false; PlaySound(pfPlay); end;
end;
if (key=VK_DOWN) and (Blocked=false) then begin // Key Down
if PosChar=4 then begin PosChar:=1; ImageMan1.visible:=true; ImageMan4.visible:=false; end;
if PosChar=7 then begin PosChar:=4; ImageMan4.visible:=true; ImageMan7.visible:=false; end;
if PosChar=5 then begin PosChar:=2; ImageMan2.visible:=true; ImageMan5.visible:=false; end;
if PosChar=8 then begin PosChar:=5; ImageMan5.visible:=true; ImageMan8.visible:=false; end;
if PosChar=6 then begin PosChar:=3; ImageMan3.visible:=true; ImageMan6.visible:=false; end;
if PosChar=9 then begin PosChar:=6; ImageMan6.visible:=true; ImageMan9.visible:=false; end;
if PosChar=10 then begin PosChar:=9; ImageMan9.visible:=true; ImageMan10.visible:=false; end;
end;
if (key=VK_UP) and (Blocked=false) then begin // Key Up
if ((PosChar=10) and (BombCPos<>2)) then begin PosChar:=11; ImageMan11.visible:=true; ImageMan10.visible:=false; end;
if PosChar=9 then begin PosChar:=10; ImageMan10.visible:=true; ImageMan9.visible:=false; Score:=Score+20; end;
if PosChar=4 then begin PosChar:=7; ImageMan7.visible:=true; ImageMan4.visible:=false; Score:=Score+20; end;
if PosChar=1 then begin PosChar:=4; ImageMan4.visible:=true; ImageMan1.visible:=false; Score:=Score+20; end;
if PosChar=5 then begin PosChar:=8; ImageMan8.visible:=true; ImageMan5.visible:=false; Score:=Score+20; end;
if PosChar=2 then begin PosChar:=5; ImageMan5.visible:=true; ImageMan2.visible:=false; Score:=Score+20; end;
if PosChar=6 then begin PosChar:=9; ImageMan9.visible:=true; ImageMan6.visible:=false; Score:=Score+20; end;
if PosChar=3 then begin PosChar:=6; ImageMan6.visible:=true; ImageMan3.visible:=false; Score:=Score+20; end;
if PosChar=0 then begin PosChar:=1; ImageMan1.visible:=true; ImageMan0.visible:=false; Score:=Score+20; end;
end;


Design of the "Game" form - Level 1

To create the "Game" form, follow the steps below:

- File->New->Form – Delphi for Win32
- Object Inspector->Properties->Miscellaneous->Name->FormGame
- Object Inspector->Properties->Miscellaneous->Position->poScreenCenter
- Object Inspector->Properties->Layout->Autosize->True
- Object Inspector->Properties->Layout->Autoscroll->False
- Object Inspector->Properties->Layout->Scaled->False
- Object Inspector->Properties->Layout->Left->-500
- Object Inspector->Properties->Layout->Top->-1000
- Object Inspector->Properties->Input->KeyPreview->True
- Object Inspector->Properties->Visual->BorderIcons->biMinimize->False
- Object Inspector->Properties->Visual->BorderIcons->biMaximize->False
- Object Inspector->Properties->Visual->BorderStyle->bsNone
- Object Inspector->Events->Miscellaneous->OnCreate
- Object Inspector->Events->Input->OnKeyDown

Then for each character of the game you need to add, follow the steps below:

- Tool Palette->Supplement->TImage
- Object Inspector->Properties->Miscellaneous->Name->ImageMan1
- Object Inspector->Properties->Miscellaneous->Transparent->True
- Object Inspector->Properties->Localizable->Picture->Load->man01.bmp
- Object Inspector->Properties->Layout->Autosize->True

To go faster you can use copy/paste to create the subsequent characters and just modify the picture and the name.

Coding the "Front" form

Here is the code for clicking the game:

procedure TFormFront.ImageFrontClick(Sender: TObject);
begin
Close;
FormGame.Position:=poScreenCenter;
end;

Design of the "Front" form

To create the "Front" form, follow the steps below:

- File->New->Form – Delphi for Win32
- Object Inspector->Properties->Miscellaneous->Name->FormFront
- Object Inspector->Properties->Miscellaneous->Position->poDesigned
- Object Inspector->Properties->Layout->Autosize->True
- Object Inspector->Properties->Layout->Autoscroll->False
- Object Inspector->Properties->Layout->Scaled->False
- Object Inspector->Properties->Visual->BorderIcons->biMinimize->False
- Object Inspector->Properties->Visual->BorderIcons->biMaximize->False
- Object Inspector->Properties->Visual->BorderStyle->bsNone

Then to add the picture of the closed game, follow the steps below:

- Tool Palette->Supplement->TImage
- Object Inspector->Properties->Miscellaneous->Name->ImageFront
- Object Inspector->Properties->Localizable->Picture->Load->Front.jpg
- Object Inspector->Properties->Layout->Autosize->True
- Object Inspector->Events->Input->OnClick->ImageFrontClick

Here is the end result:

Coding the "Splash" form

You then need to add the corresponding routines; here is the code for clicking the email:

procedure TFormSplash.MailClick(Sender: TObject);
begin
ShellExecute(Handle,'open','mailto:julien_foyard@hotmail.com',nil,'',SW_SHOWNORMAL);
end;


Here is the code for clicking the website:

procedure TFormSplash.websiteClick(Sender: TObject);
begin
ShellExecute(Handle,'open','http://chokocat.chez-alice.fr',nil,'',SW_SHOWNORMAL);
end;


Here is the code for clicking the start button:

procedure TFormSplash.ButtonStartClick(Sender: TObject);
begin
Close;
FormGame.Position:=poScreenCenter;
end;

Design of the "Splash" form

To create the "Splash" form, follow the steps below:

- File->New->Form – Delphi for Win32
- Object Inspector->Properties->Miscellaneous->Name->FormSplash
- Object Inspector->Properties->Miscellaneous->Position->poScreenCenter
- Object Inspector->Properties->Action->Caption->Airport Panic (Bandai)
- Object Inspector->Properties->Layout->Autoscroll->False
- Object Inspector->Properties->Layout->Scaled->False
- Object Inspector->Properties->Input->KeyPreview->True
- Object Inspector->Properties->Visual->BorderIcons->biMinimize->False
- Object Inspector->Properties->Visual->BorderIcons->biMaximize->False
- Object Inspector->Properties->Visual->BorderIcons->biSystemMenu->False
- Object Inspector->Properties->Visual->BorderStyle->bsSingle

Then to add the picture of the box artwork, follow the steps below:

- Tool Palette->Supplement->TImage
- Object Inspector->Properties->Miscellaneous->Name->Imagebox
- Object Inspector->Properties->Localizable->Picture->Load->AirportPanic.jpg
- Object Inspector->Properties->Layout->Autosize->True

To add a text message, follow the steps below:

- Tool Palette->Standard->TLabel
- Object Inspector->Properties->Miscellaneous->Name->Text
- Object Inspector->Action->Caption->Released by CHOKOCAT

To add a clickable mail address, follow the steps below:

- Tool Palette->Standard->TLabel
- Object Inspector->Properties->Miscellaneous->Name->Mail
- Object Inspector->Action->Caption->mailto:julien_foyard@hotmail.com
- Object Inspector->Properties->Visual->Cursor->crHandPoint
- Object Inspector->Events->Input->OnClick->MailClick

To add a linkable webpage, follow the steps below:

- Tool Palette->Standard->TLabel
- Object Inspector->Properties->Miscellaneous->Name->Website
- Object Inspector->Action->Caption->http://chokocat.chez-alice.fr
- Object Inspector->Properties->Visual->Cursor->crHandPoint
- Object Inspector->Events->Input->OnClick->websiteClick

To add a button, follow the steps below:

- Tool Palette->Standard->TButton
- Object Inspector->Properties->Miscellaneous->Name->ButtonStart
- Object Inspector->Properties->Visual->Cursor->crHandPoint
- Object Inspector->Action->Caption->Start
- Object Inspector->Events->Input->OnClick->ButtonStartClick

Here is the end result:

Thursday, September 14, 2006

Step 3 - Starting the design and coding!

I'll introduce my tools:

- Computer: Laptop PC, Dell Latitude D410 Intel Pentium M 1.6 GHz with 512 MB RAM
- Operating System: Windows XP Professional
- Programming software: Borland Delphi 2005 (choose Custom Installation and select Borland Delphi 2005 for Microsoft Win32, this will save you disk space and time when you launch the application)
- Language: Delphi


Delphi is pretty straight forward... Indeed, I'm not an engineer and sort of managed to understand and get it work ;-)

By the way, it is worth mentionning a very useful and free tool that can be used to launch Borland Delphi which is called Delphi Configuration Manager that basically allow you to lauch a minimal configuration version of Borland Delphi saving you again some time and resources!

In terms of the structure, I will create the following elements:

- A first screen displaying the box artwork


- A second screen displaying the game closed


- A last screen displaying the game opened


In Delphi, that translates into a main program or executable (AirportPanic.exe) embedding 3 different sections:
- "Splash": introduction screen displaying the box artwork
- "Front": game closed, need to click to open the game
- "Game": game open and ready to play

I've been able to leverage much from my previous simulator, but I'll still explain the detail of the different actions to perform to build those different sections.

Links:
- Dell
- Borland Delphi
- Delphi Configuration Manager

Step 2 - Creating the characters

Now based on the two photos capturing all the characters for level 1 and 2, you need to cut each character, erase the unneeded surroundings and save it into a new single image (24-bit Bitmap file *.bmp).


Indeed, the principle of the simulator is to show or not a character when required, according to the game's pattern.

You may decide also what name to give to each single image or character. That will then be usefull when we'll start coding the game program!

Here is the naming structure for Level 1:


And the naming structure for Level 2:

Step 1 - Taking pictures of the game

Now you have the game, you need to take some pictures of the game. I've tried to scan the game, but wasn't successful when it comes to capturing the characters... due to the fact that the game is solar powered!

Between the European and Japanese version, I'll choose the Japanese one, because it is the original release of the game (Bandai is a Japanese company) and the box is kinda cool.

Basically, you need 3 photos, so open the game and take the following photos:

- first one is the game turned off (sometimes it might be tricky as the game turns on automatically, the trick is to take one picture with something in front of the solar panel and one without and then merge the two pictures with an imaging software - end result below)


- second one is the game turned on with all characters of the first level


- last one is the game turned on with all characters of the second level


Personally, I take some more:

- The box that contains the game


- Top of the game when it is closed


For information, I'm using a Nikon Coolpix 3100, at 3 Megapixel resolution.


I'm a bit ashamed as I don't use Adobe Photoshop, but the lame Microsoft Paint as my imaging software.

You can also scan the Instruction manual.

Links:
- Nikon Digital
- Adobe Photoshop

Step 0 - Getting the game

Obviously the idea is to have the original game. Indeed, as you will need to simulate the pattern of the game, you will have to play the game and reproduce it onto the PC.

I got my game (European version of it) in a shop in Paris that is selling vintage toys. Hopefully my game is brand new, and comes from an old toy store stock! Off course it is complete with box and instructions.


The Japanese version of the game comes from a Belgian seller on eBay, it is in brand new condition. It came with the box only. I got the instructions from another Belgian eBay seller!


I think I should explain what the game is all about, so here is a transcript of the game instructions:

"Scene 1 : In the airport at airplane embarkment
Move the police inspector to make him board the plane while avoiding the bombs thrown by the highjacker by hiding behind the cars. Screen changes automatically to scene 2 when the inspector has boarded the plane 3 times.

Scene 2 : In the airplane
Shoot at the highjacker and avoid hitting the passengers standing up. Shoot the highjacker 10 times to rescue the stewardess. The game switches automatically to scene 1."

Links:
- eBay
- Yahoo! Japan Auctions

How to build a simulator?

Hi boys and girls,

I've thought about it and I've decided to change things. Indeed, I realized I was using my website as a blog, and my blog as a website... So I'm going to fix that and start using this blog as a real blog.

Now, what am I going to write on this blog. Well I've decided to start to work on a new simulator. Why not describe the different steps of building the simulator and follow up on the progress as the project goes along.

Sounds exciting, no? Actually I should maybe explain what a simulator is and what I intend to simulate!

To make it clear, as I love and collect the Bandai solar handhelds (see previous posts), I intend to simulate the original game on a PC.

My previous and first simulator was for Bandai Frankenstein (Mr. Franken in Japanese). This time I'll simulate Bandai Airport Panic. Reason for that choice:

- Frankenstein had an easy pattern, Airport Panic would be second on the list
- Like Frankenstein, Airport Panic has also a mode where you can display all the characters, unlike Terror House and Amazone
- I like games with terrorists hijacking a plane ;-)

Links:
- Download My Bandai Simulators